
RPC
远程过程调用(英语:Remote Procedure Call,缩写为 RPC)是一个计算机通信协议。该协议允许运行于一台计算机的程序调用另一个地址空间(通常为一个开放网络的一台计算机)的子程序,而程序员就像调用本地程序一样,无需额外地为这个交互作用编程(无需关注细节)。RPC是一种服务器-客户端(Client/Server)模式,经典实现是一个通过发送请求-接受回应进行信息交互的系统。
简单来说,RPC就是一个CS模型。传统CS直接进行连接,像类似中断重连,重复请求,双向的信息交互都需要一个一个写操作。而一个好的RPC框架为我们提供了接口,只需要面向过程编程即可。
RPC流程:
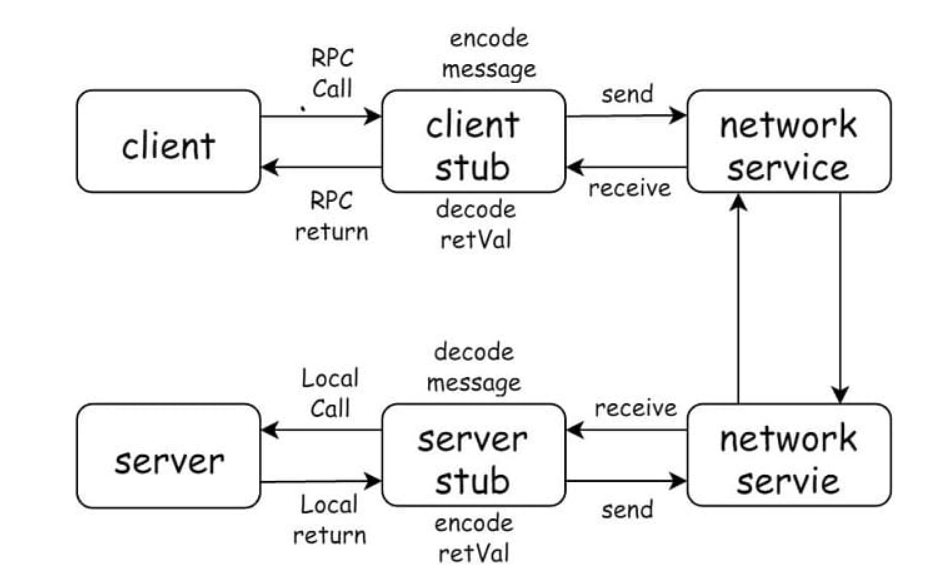
从上图可以看出,rpc本身也是一种 request-response 协议。
有些实现扩展了远程调用的模型,实现了双向的服务调用,但是不管怎样,调用过程还是由一个客户端发起,服务器端提供响应,基本模型没有变化。
服务的调用过程为:
- client调用client stub,这是一次本地过程调用
- client stub将参数打包成一个消息,然后发送这个消息。打包过程也叫做 marshalling(编码)
- client所在的系统将消息发送给server
- server的的系统将收到的包传给server stub
- server stub解包得到参数。 解包也被称作 unmarshalling(解码)
- 最后server stub调用服务过程. 返回结果按照相反的步骤传给client
golang自带的rpc框架也不错,不过更多的尝试还是放在了Google的开源跨语言rpc框架gRPC。
gRPC
在认识gRPC前需要先了解protobuf。
gRPC uses Protocol Buffers, Google’s mature open source mechanism for serializing structured data (although it can be used with other data formats such as JSON). Here’s a quick intro to how it works. If you’re already familiar with protocol buffers, feel free to skip ahead to the next section.
The first step when working with protocol buffers is to define the structure for the data you want to serialize in a proto file: this is an ordinary text file with a
.protoextension. Protocol buffer data is structured as messages, where each message is a small logical record of information containing a series of name-value pairs called fields.

使用protobuf需要预先下载protoc二进制文件以及转化为go的插件,下面以一个栗子说明。
├── client
│   └── main.go
├── pb
│   └── hello.proto
└── server
    └── main.go
编写proto
定义service
如果想要将消息类型用在RPC系统中,可以在.proto文件中定义一个RPC服务接口,protobuf编译器会根据所选择的不同语言生成服务接口代码
例如,想要定义一个RPC服务并具有一个方法,该方法接收HelloRequest并返回一个HelloReply,此时可以在.proto文件中进行如下定义:
service Greeter {
    // SayHello 方法
    rpc SayHello (HelloRequest) returns (HelloReply) {}
}
定义message
上述方法中,传入的Request以及返回的Reply都属于message,一个message类型定义描述了一个请求或响应的消息格式,可以包含多种类型字段,在转化为go后message相当于一个结构体。
message HelloRequest {
    string name = 1;
}


// 包含问候语的响应消息
message HelloReply {
    string message = 1;
}
总代码
syntax = "proto3"; // 版本声明,使用Protocol Buffers v3版本

option go_package=".";

package pb; // 包名


// 定义一个打招呼服务
service Greeter {
    // SayHello 方法
    rpc SayHello (HelloRequest) returns (HelloReply) {}
}

// 包含人名的一个请求消息
message HelloRequest {
    string name = 1;
}


// 包含问候语的响应消息
message HelloReply {
    string message = 1;
}
编译
pb/
$ protoc --go_out=plugins=grpc:. hello.proto
在当前目录生成了hello.pb.go
编写server端
package main

import (
	"fmt"
	"net"

	pb "rpc-demo/hello/pb"

	"golang.org/x/net/context"
	"google.golang.org/grpc"
)

type server struct{}

func (s *server) SayHello(ctx context.Context, in *pb.HelloRequest) (*pb.HelloReply, error) {
	return &pb.HelloReply{Message: "Hello " + in.Name}, nil
}

func main() {
	// 监听本地的20022端口
	conn, err := net.Listen("tcp", ":20022")
	if err != nil {
		fmt.Printf("failed to listen: %v", err)
		return
	}
	s := grpc.NewServer()                  // 创建gRPC服务器
	pb.RegisterGreeterServer(s, &server{}) // 在gRPC服务端注册服务


	err = s.Serve(conn)
	if err != nil {
		fmt.Printf("failed to serve: %v", err)
		return
	}
}
和传统cs模型没有很大差别,只是多了一个gRPC服务注册。
编写client
package main

import (
	"context"
	"fmt"

	pb "rpc-demo/hello/pb"

	"google.golang.org/grpc"
)

func main() {
	// 连接服务器
	conn, err := grpc.Dial("127.0.0.1:20022", grpc.WithInsecure())
	if err != nil {
		fmt.Printf("faild to connect: %v", err)
	}
	defer conn.Close()

	c := pb.NewGreeterClient(conn)
	// 调用服务端的SayHello
	r, err := c.SayHello(context.Background(), &pb.HelloRequest{Name: "Theoyu"})
	if err != nil {
		fmt.Printf("could not greet: %v", err)
	}
	fmt.Printf("Greeting: %s !\n", r.Message)
}
这里grpc.dial用到了grpc.WithInsecure(),可以用credentials去指定tls认证。
认证
认证分tls和token两种,tls就不过多阐述,这里在上面case的基础上加一个token认证。grpc的token认证主要放在客户端,服务器相当于只是在service里对client传来的metadata进行一个验证。
Client
首先看上个栗子中的grpc.WithInsecure(),这里传入的是一个DialOption,实际上gRPC支持我们去自定义一个Credential,我们看一下 WithPerRPCCredentials()
func WithPerRPCCredentials(creds credentials.PerRPCCredentials) DialOption {
	return newFuncDialOption(func(o *dialOptions) {
		o.copts.PerRPCCredentials = append(o.copts.PerRPCCredentials, creds)
	})
}
这里要求我们传入一个credentials.PerRPCCredentials,跟进看一看:
type PerRPCCredentials interface {
	// GetRequestMetadata gets the current request metadata, refreshing
	// tokens if required. This should be called by the transport layer on
	// each request, and the data should be populated in headers or other
	// context. If a status code is returned, it will be used as the status
	// for the RPC. uri is the URI of the entry point for the request.
	// When supported by the underlying implementation, ctx can be used for
	// timeout and cancellation. Additionally, RequestInfo data will be
	// available via ctx to this call.
	// TODO(zhaoq): Define the set of the qualified keys instead of leaving
	// it as an arbitrary string.
	GetRequestMetadata(ctx context.Context, uri ...string) (map[string]string, error)
	// RequireTransportSecurity indicates whether the credentials requires
	// transport security.
	RequireTransportSecurity() bool
}
上面的GetRequestMetadata()也就是我们传入的token,服务端可以对其进行验证,RequireTransportSecurity()为tls设立,这里设置为false。
type customCredential struct{}


func (c customCredential) GetRequestMetadata(ctx context.Context,uri ...string) (map[string]string, error){
	return map[string]string{
		"id": "666666",
		"key": "hack",
	},nil
}

// RequireTransportSecurity 自定义认证是否开启TLS
func (c customCredential) RequireTransportSecurity() bool {
    return true
}

func main(){
    ......
    var opts []grpc.DialOption

	opts=append(opts, grpc.WithInsecure())

	opts=append(opts, grpc.WithPerRPCCredentials(new(customCredential)))

	// 连接服务器
	conn, err := grpc.Dial(":20022", opts...)
    ......

}
Server
Server只需重新改写Sayhello方法即可
......
func (s *server) SayHello(ctx context.Context,req *pb.HelloRequest) (*pb.HelloReply,error){

	md,ok:=metadata.FromIncomingContext(ctx)

	if !ok{
		return nil,status.Errorf(codes.Unauthenticated,"No token")
	}

	var (
        id  string
        key string
    )

    if val, ok := md["id"]; ok {
        id = val[0]
    }

    if val, ok := md["key"]; ok {
        key = val[0]
    }
	if key != "password" {
        return nil, grpc.Errorf(codes.Unauthenticated, "Token认证信息无效: id=%s, key=%s", id, key)
    }

	return &pb.HelloReply{Message: "Hello"+req.Name},nil
}
......
$ go run main.go
could not greet: rpc error: code = Unauthenticated desc = Token认证信息无效: id=666666, key=hack
$ go run main.go
Greeting: HelloTheoyu !
拦截器
上述栗子可以看到..我们的认证是写到Service的方法里面,如果有多个Service,相当于服务端每一个方法都需要写入认证。grpc服务端和客户端都提供了interceptor功能,很适合去处理验证、日志等流程。
拦截器写在客户端可以用于打印一些时间,日志等信息,不过这里只需要修改服务端即可。
我们把服务端Sayhello中认证的部分提出来,写到auth 函数中。
func interceptor(ctx context.Context, req interface{}, info *grpc.UnaryServerInfo, handler grpc.UnaryHandler) (interface{}, error) {
	err:=auth(ctx)
	if err!=nil{
		return nil,err
	}
	//continue
	return handler(ctx,req)
}
在主函数中创建 []grpc.ServerOption,这里初始化的步骤和Client很像:
var opts []grpc.ServerOption
opts = append(opts, grpc.UnaryInterceptor(interceptor))

s:=grpc.NewServer(opts...)
pb.RegisterGreeterServer(s,&server{})
中间件
其实用到拦截器的时候我就有一些疑惑,因为这个功能用起来和中间件没什么区别,但实际上gRPC中只能设置一个拦截器,这就会导致一大堆功能写在里面会比较乱。第三方go-grpc-middleware封装了认证(auth), 日志( logging), 消息(message), 验证(validation), 重试(retries) 和监控(retries)等拦截器。可以供稍微重量一些的开发使用。
one case
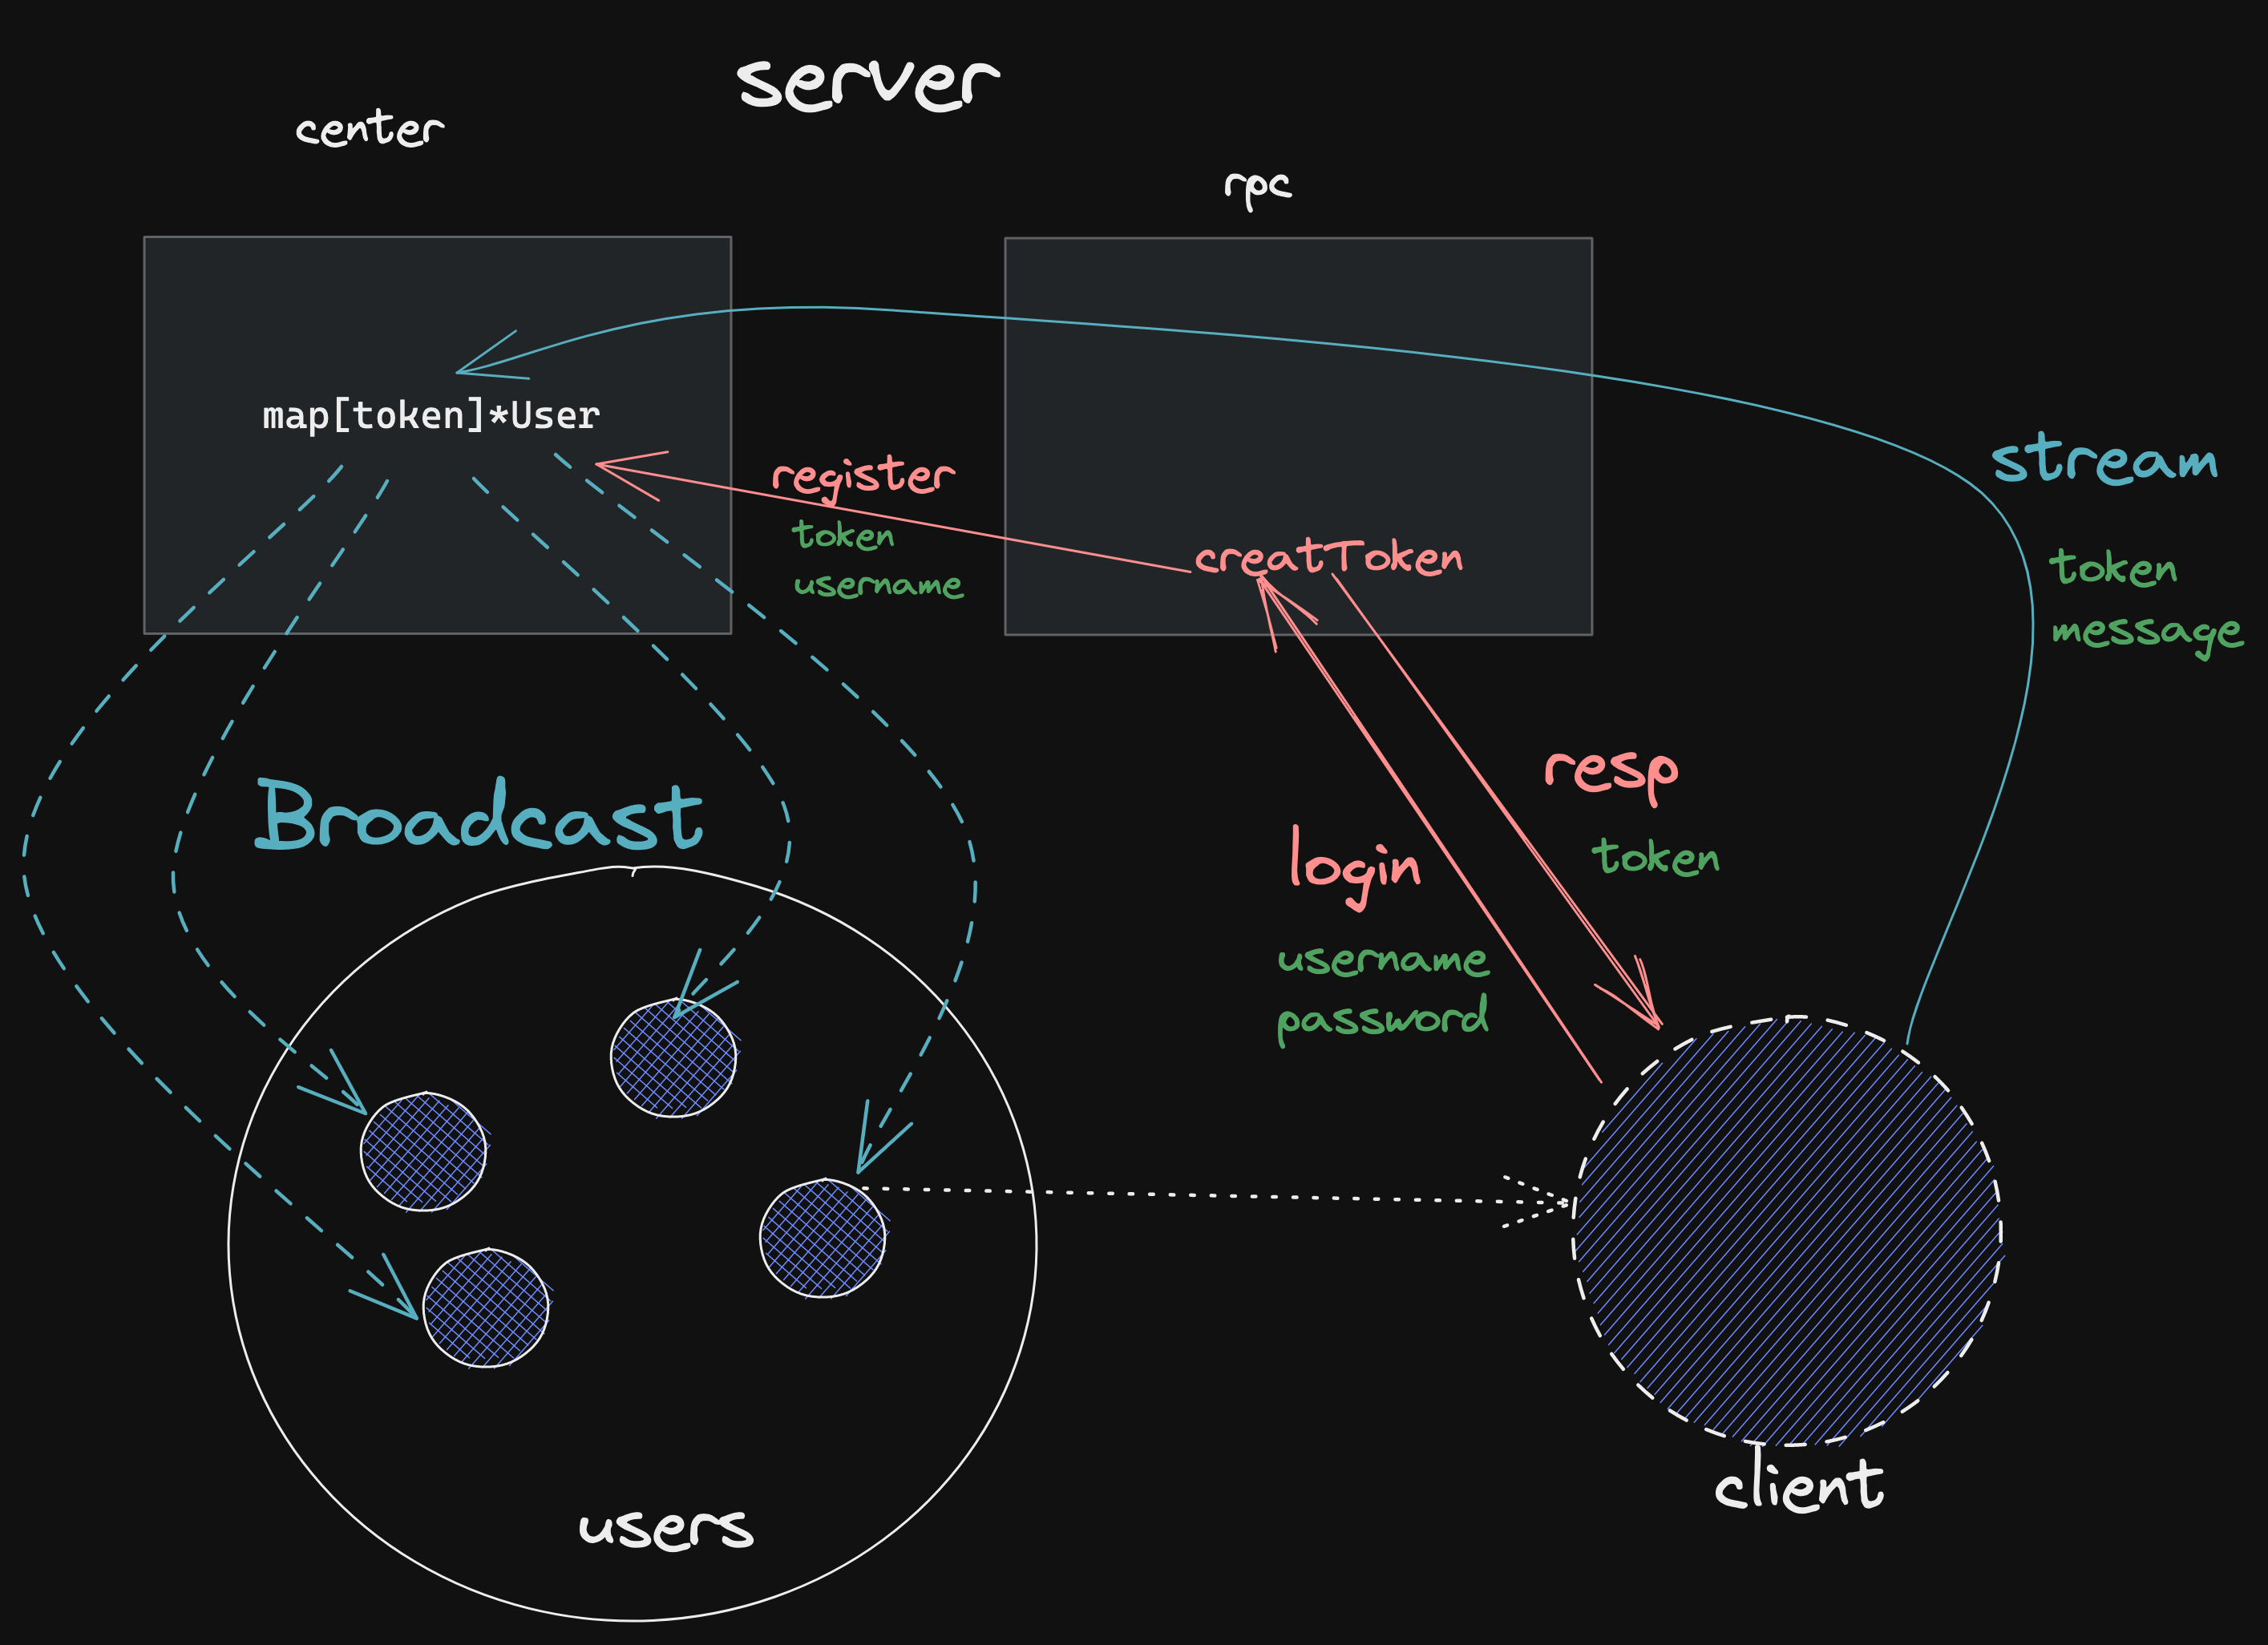
简易聊天室:github